Basics of Origami - I
This is the second post in "The Art of Origami" series.
Origami is a simple art – just one piece of square sheet (occasionally a rectangle) and the folds. Everyone knows how to fold a paper. This one fold, however, can give rise to really complex folds. In this post, I shall explore some simple folds which will be commonly used in origami design and the basic symbols used in origami folding sequences.
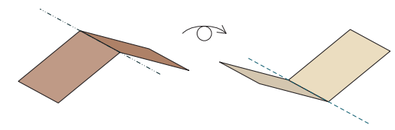 Figure 1: Mountain fold (on the left) turned over is a valley fold (on the right)
 There are only two very basic folds – a mountain fold, forming a shape like a mountain and a valley fold, forming a shape like a valley. But, even these are the same. A valley fold is just a mountain fold with the paper turned over.
| The third most important fold is the unfold. If we fold a sheet and then unfold it, it forms a crease. These creases are very useful tools which serve as reference points. They are commonly made in preparation for a complex maneuver. An important variable in making the folds is the fold angle – the angle till which the fold is made. This becomes important while making complex folds. A perfect valley fold has a fold angle of 180o, a crease 0o and a perfect mountain fold -180 degree. One more variation is the sharpness of the fold – some folds are required to be sharp while some others soft. For example, in modeling of natural objects, sharp models may give off a lifeless feeling while soft and rounded folds may denote a sense of life. | 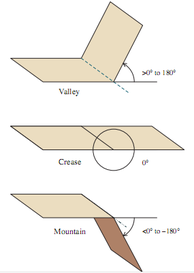 Figure 2: Fold angles |
Symbols
While there are many symbol systems to describe the folding sequences, Yoshizawa diagramming system is the most popular and I shall use the same for the sequences in this series. Verbal instructions are also added to make the job easier. Instructions will be provided as if the model lays flat in front of you.
Up, Down, Top and Bottom are references with respect to the printed page.
Near refers to the layers closest to you (i.e., those on the top) and Far refers to the layers farthest from you (i.e, those at the bottom).
Origami paper often has two different sides (commonly a colored side and a white side).
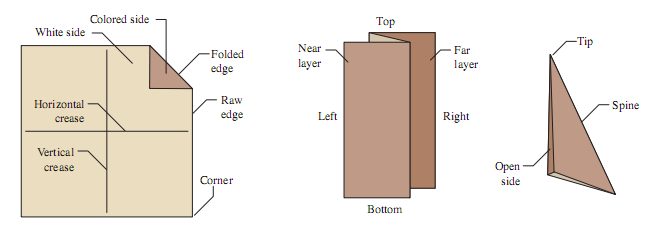
Figure 3: Verbal terms applicable to Origami diagrams
Origami diagrams are usually line drawings. There are 5 different types of lines used for different features of the folded shape as shown below.
 Figure 4: Different line patterns | Paper edges (raw edges) are indicated by solid line. Valley folds are indicated by dashed line. Mountain folds are indicated by chain line (dot-dot-dash). X-ray lines are for hidden edges and creases are represented by a solid line not touching the edges. Actions needed to be performed are indicated by arrows that show the motion of the paper as a fold is made. The basic actions used in an origami model are shown below. |
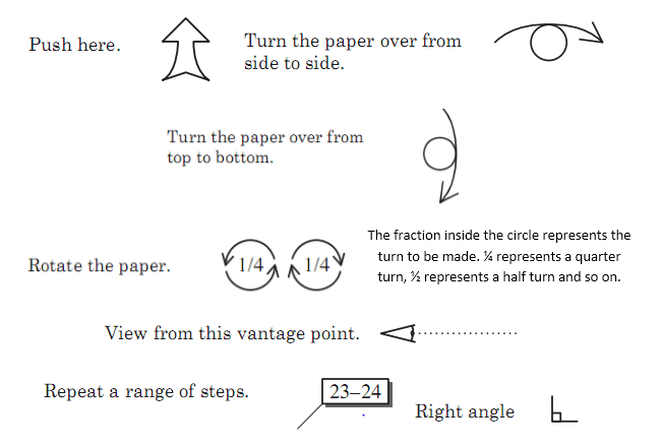
Figure 5: Basic origami actions
Once you have understood these symbols, you are ready to jump into the world of origami models and designs. Before that, you need to learn the basic folds required to easily arrive at the final models. We shall look at the various folds in the next post. However if you are too eager to learn, you can google the following folds (we will discuss these over the next few posts).
Each of these has a specific purpose and in future posts we shall see how each of these can be used in various applications.
Aravind Maddireddy is a PGP student at IIM Ahmedabad and a member of Finesse.
Source: “Origami Design Secrets” by Robert J Lang.
- Mountain fold
- Valley fold
- Inside reverse fold
- Outside reverse fold
- Hybrid reverse fold
- Rabbit ear fold (and the variations)
- Double rabbit ear
- Squash fold
- Swivel fold
- Petal fold
- Pleat
- Crimp
- Spread sink
- Sink fold (Open sink, closed sink and mixed sink)
- Double sink
- Unsink fold (Open and closed)
Each of these has a specific purpose and in future posts we shall see how each of these can be used in various applications.
Aravind Maddireddy is a PGP student at IIM Ahmedabad and a member of Finesse.
Source: “Origami Design Secrets” by Robert J Lang.
 RSS Feed
